General Methods When Move to iOS Not Working
Here are a few basic methods you can try if Move to iOS not working.
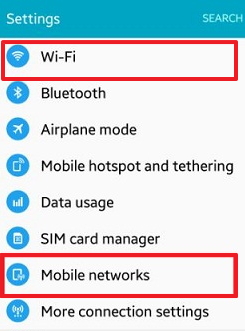
Method 1: Check The Network Connection on Both Devices
Method 2: Restart Both iOS & Android Devices
Method 3: Switch between Wi-Fi and Mobile Networks
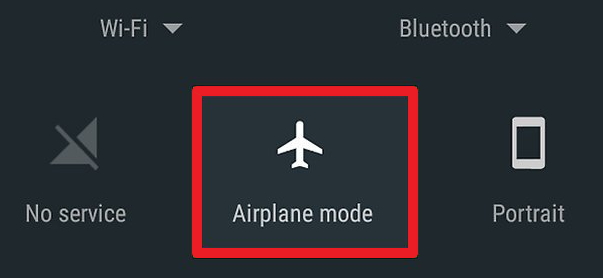
Method 4: Put Android into Airplane Mode
Method 5: Download & Install Latest Firmware
Method 1: Check The Network Connection on Both Devices
The first thing you should do is make sure that both devices are connected to the same network. You can find the network settings for both iOS and Android within the “Settings” app. If they are connected to the same network and you can access the internet fine, the network isn’t the issue.

Method 2: Restart Both iOS & Android Devices
Simply turning a device off can commonly fix this type of problems. Go ahead and turn both devices off -> wait a few minutes and turn them back on -> then try again.

Method 3: Switch between Wi-Fi and Mobile Networks
If you’re moving from an Android device to an iOS device, disable the Android’s Wi-Fi connection and try using mobile networks instead. After a few minutes, if you don’t yield the results you need, try Wi-Fi again.
Method 4: Put Android into Airplane Mode
Another quick solution is to enable Airplane Mode for a few moments on your Android device. This completely shuts down the device’s network connections and can be helpful to fix Move to iOS not working.
Method 5: Download & Install Latest Firmware
Most importantly, ensure that both devices have the most recent firmware installed. Every iOS and Android update includes bug fixes and if the problem you’re experiencing is already known, it may well be fixed.

Part 2: Alternative Way for Move to iOS Not Working
An alternative solution is to avoid the Move to iOS app altogether and take the manual approach. Below are the alternative fix which we can find for you.
Step 1: Move Files from Android to Computer via USB
Step 2: Transfer The Moved Files from Computer to Your iPhone via iTunes
Step 1: Move Files from Android to Computer via USB
Choose one according to the type of computer you’re using.
For Windows computers:
Connect your Android device using a USB cable and unlock it.
On the device, tap on the notification “USB for...” which appears and choose “Transfer files”.
Back on your computer, a file explorer will appear. Drag the Android files to a folder on your computer that you can access later.
When you’re finished transferring, disconnect your device.

For Mac computers:
Connect your Android device with a lightning cable and unlock it.
Download and install the “
Android File Transfer” program.
When a notification “USB for...” appears on your device, tap on it. Then select “Transfer files”.
Back on your computer, use the Android File Transfer windows to drag files off of your device.

Windows and Mac computers are very easy to use and help you when Move to iOS app not working. So after get your data off your Android, you can now drag the data onto iTunes and sync it with your iPhone.
Step 2: Transfer The Moved Files from Computer to Your iPhone via iTunes
Use a lightning cable to connect your iPhone to a computer.
Open iTunes and click on the device icon, then on “File Sharing” from the sidebar.
Choose an app that you want to transfer data to from the list shown.
Click “Add” and locate the files that you want to transfer to your iPhone.
Repeat this process until you’ve transferred all of the data that you want to have on your iPhone.
Bonus Tips:
11 BEST IPHONE X SECRET
TIPS AND TRICKS EVERYONE SHOULD KNOW 2018
1. Open the App Switcher like a pro:
Swipe up from the bottom to the middle of your screen and hold until you see the App Switcher.
Swipe left or right to find the app that you want to use.
Tap the app.
2. Bring back the home button (sort of): Go to General > Accessibility > AssistiveTouch and turn it on. You’ll now see a virtual home button that you can customize to activate shortcuts.
3. Unlock with Face ID faster: Turn off attention detection, Face ID needs a certain set of data each time it’s used, and there’s no getting around that. Face ID needs to be able to detect your eyes, nose, and mouth. While it can detect your eyes even when they’re closed (if attention is off), you’ll need to have your nose and mouth uncovered if you plan on unlocking your iPhone X with your face.
4. Show battery percentage: To show the battery percentage in the status bar, go to Settings > Battery and turn on Battery Percentage. Swipe down from the top-right corner of the iPhone X’s display to open Control Center, and check, the battery percentage is included.
5. How to disable Face ID in an instant: If you don’t want Face ID to require that you look with your eyes open at iPhone X, you can open Settings > General > Accessibility, and disable Require Attention for Face ID. This is automatically disabled if you enable VoiceOver during initial set up.
6. Flip quickly between apps
7. Save up to 60% battery life: Check which wallpaper you using, Which apps running back and consuming energy.
8. Make Control Center easier to reach: Go to Settings > Accessibility > Reachability.
9. Quiet alarms with your Face: After picking it up, Face ID will look for your face, and if it see it, it’ll automatically lower the volume.
10. Animoji as stickers
11. Tap to wake: Many Android phones have had a “double-tap to wake” up the display feature for years. Now, iPhone X users have a similar feature, only it only requires a tap.
If you accidentally deleted or lost videos on iPhone, first please check on the Recently Deleted folder. Alternatively, you can use the professional tool
Gihosoft iPhone Recovery to
recover deleted iPhone videos from Camera Roll or some apps.