Thursday 28 February 2019

Transfer WhatsApp from iPhone to iPad (2019) 2019


Get WhatsApp Messages from iPhone to iPad via Official Feature

If you look at the WhatsApp application, you’ll see that there is an official feature for transferring messages. To use this feature for transferring your data, follow these steps:


On your iPhone go to “Settings > Chat Settings > Back Up Now”. Tap Back Up Now again to confirm the backup.


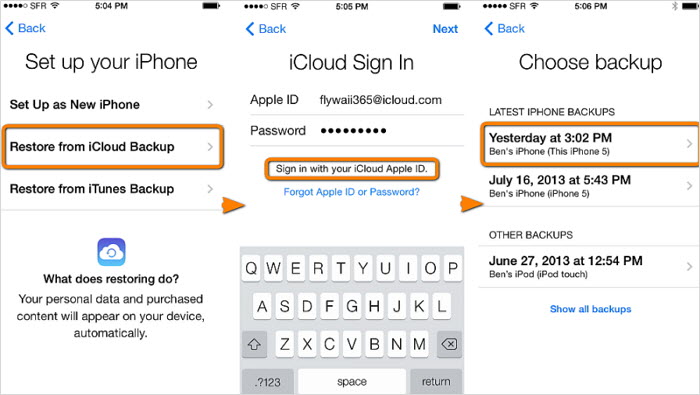
Now on your iPad, install WhatsApp and sign in using the same phone number.


When given the option, choose to restore chat messages from a backup.


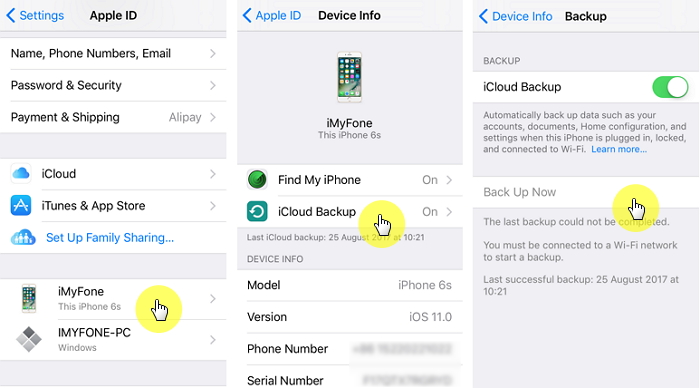
Transfer WhatsApp from iPhone to iPad via iCloud Backup

You can also transfer WhatsApp messages from iPhone to iPad directly through your iCloud account, which will wipe out all current data on target iPad. This is the drawbacks of this method, but it’ll do the job.


On your iPhone, open “Settings” and go to “Apple ID > iCloud”. If backups aren’t enabled, press the “iCloud Backup” slider.


Tap the “Back Up Now” button and wait while your device data is backed up.


Turn on your iPad and after signing in with the same Apple ID, restore the backup that you just created.Also Read:Windows Media Player Won’t Play AVI Troubleshooting

Also Read:Top 10 Best Football Live Streaming Sites for You to Watch Soccer Live on TV 2019

Also Read:10 Best Party Planner Apps for your iPhone and iPad in 2019

Also Read:Best Inventory Management Apps for iPhone and iPad in 2019

Also Read:How to Permanently Delete Photos and Videos from Samsung Mobile Phone


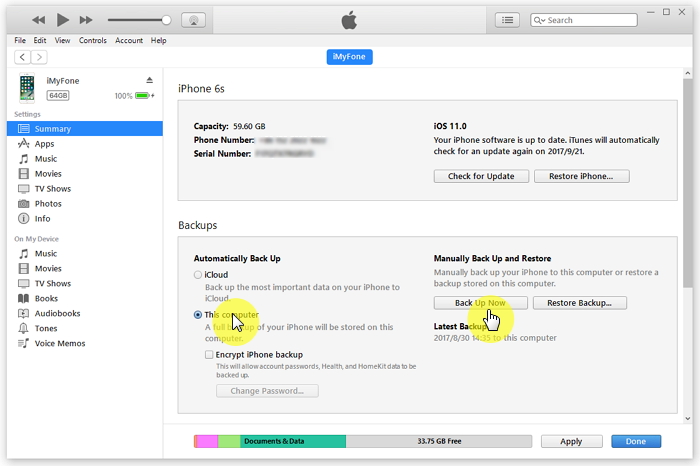
Transfer WhatsApp from iPhone to iPad via iTunes Backup

A similar approach can be taken, and you can transfer WhatsApp backup iPhone without iCloud but instead via iTunes.


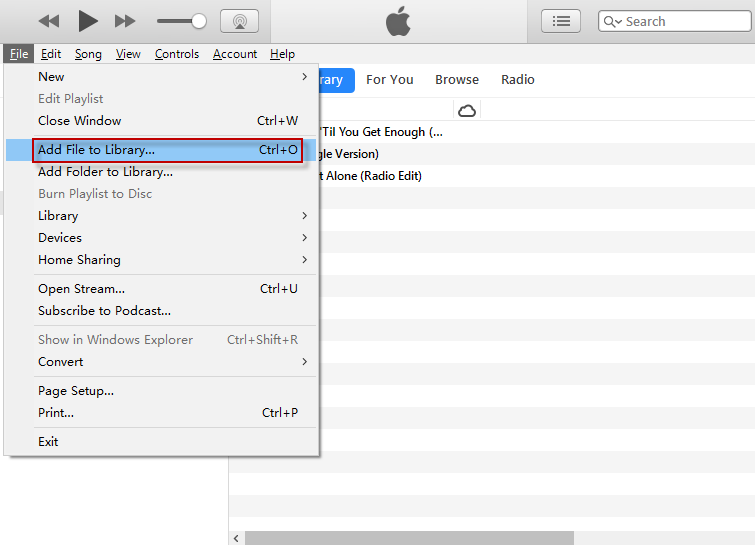
Connect your iPhone to the computer using a lightning cable and open iTunes. Direct yourself to “File > Devices > Back Up”.


Once the backup is complete, disconnect your iPhone and instead connect your iPad.


Go to the summary page and click “Restore Backup…”. Choose the iTunes backup that you had taken of your iPhone.


Alternative Way to Transfer WhatsApp Messages from iPhone to iPad

Sponsor ads:

Gihosoft Free iPhone Data Recovery:https://www.gihosoft.com/iphone-data-recovery-free.html

Gihosoft iPhone Data Recovery Free

Free iPhone Data Recovery Software for Windows/Mac

Recover up to 12+ types of files, including contacts, SMS, photos, WhatsApp, Viber, notes, etc.

Restore lost data from iOS devices directly or from iTunes and iCloud backup

Recover iPhone data lost due to iOS upgrade/jailbreak, accidental deletion, device lost or broken

Support all the latest iPhone, iPad and iPod Touch

Both Free and Pro version.

If you lost data after you updated to a new iPhone, you can always use Gihosoft iPhone Data Recovery to get the data back from the old iPhone or backup.You may also like: iphonerecovery.com

If you use android phones, please choose Gihosoft Android Data Recovery.

With Gihosoft Android Data Recovery, no longer afraid of data loss!

Must read:Youtube video downloader for pc

Gihosoft RePicvid Free Photo Recovery Software provides a free photo recovery software for windows to help users recover the deleted or lost photo for free.

Jihosoft Android Data Recovery: the best Android Data Recovery software for Windows and Mac to recover deleted contacts, messages, photos, videos, WhatsApp and etc from Android devices.Tips:How to transfer messages from iPhone to iPhone


jihosoft Free iPhone Data Recovery

Fix iPhone Stuck on Searching

If your iPhone is stuck up in the searching process then you have to look upon the issue immediately and try to fix it. Most users might run towards the service center in order to get rid of this problem. This issue may arise due to two reasons: the physical damage or software error. The internal antenna could be damaged if you drop the phone or cause any physical damage without your knowledge. The next reason is the software error. You have to visit the service center if the internal antenna was collapsed else you can fix it by yourself by reading this article carefully. The first step is to ensure the built-in antenna is fine before proceeding with the next step in resolving the software error. Make use of this article as a simple guide to fix this searching issue without much difficulty.

Also Read:XD Card Recovery – Recover Deleted Photos from xD-Picture Card

Also Read:How to Convert SWF to MP4 on Mac or Windows

Also Read:7 Best iPhone Photo Editor Apps To Achieve Filter and Psychedelic Look

Also Read:5 Best Free Movie Streaming Sites like Pubfilm to Watch Movies Online 2019

Why iPhone Keeps Saying Searching

The iPhone keeps saying searching due to unavailability of towers or device problem. If there is no signal at your place then the iPhone will be displaying the word ‘Searching’ for hours. You have to fix this issue to ensure optimum usage. So how to get rid of this searching process which takes place for long hours? Initially you should test the signal strength in your location.
The next step you have to diagnose your device. Identify the cause for this endless searching process. It may be due to the internal antenna damage or software error.  Rush to the store to fix the damaged builtin antenna.
If there is a software error then you can fix by yourself by making use of the information provided in this article. Just follow the step by step process and fix the issue in no time. You have to identify the cause for the issue before fixing it. Approach the problem optimally in order to end up with successful results.

How to Fix an iPhone That Says Searching

Here in this article, I have discussed innumerable ways to fix the issue within a short period. Suppose, if you found your iPhone stuck in search mode due to software error then carry out the following methods to resolve the problem immediately.

1. Remove and re-insert SIM card

You may face the searching issue in your iPhone due to Sim card. Remove the Sim card from your device and reinsert it. Switch off your device open the panel and remove the Sim card. This process depends on the model you own. Do it according to your device panel. Remove and re-insert the Sim card. Switch on your iPhone and note down the changes in your device. In case, if you still face this searching problem then just try out the next method.
remove and re-insert sim card

2. Reboot your iPhone

Switch off your device and on it again to get back your iPhone without any issues. To reboot the device follow the below guidelines.
On your iPhone screen search for a ‘Slide to power off’ icon and swipe off to turn off.
You can also Press and hold the power button to turn off the device.
Turn on the device by holding the power button.
Wait for 20 seconds to turn off your iPhone and then turn it on immediately. Searching issue can be resolved by rebooting your iPhone.
reboot iphone

3. Check time and date settings

The iPhone may prompt for search error if there is incorrect time and date settings in your device. Fix the date and time settings by following the given steps.
Update your iOS version in your device.
Go to the ‘Settings’ and select ‘General’
From the expanded list choose the option ‘Date and Time’.
Select the ‘Time zone’ and the device’s date and time will be restored automatically  based on your
location.
After completing the steps check out whether the searching issue has been resolved. If the problem still exists then try out other methods.
check iphone data and time settings

4. Disable and enable Airplane Mode

Now it is time to work with the Airplane mode on the device. To overcome the search errors try to enable and disable the Airplane mode. Toggle the Airplane mode between on and off to find a solution to this error.
disable and enable Airplane  Mode

5. Update carrier settings

You need a computer, data cable, iTunes and uninterrupted network connectivity to update the carrier settings.  Connect your device and open the ‘Settings’. In the settings select ‘General’ option. Tap the ‘About’ and find out whether there is any availability of update for carrier settings. Press the ‘Download and Update’ button to trigger the updating process. Restart your device soon after the completion of the updating process. Now have a look at the signal bar and learn whether the search issue has been resolved. Move on with the next method if you still face the issue.
update carrier settings on iphone

6. Repair your iOS system

After trying out the methods above, if you feel it doesn’t work out well on your device, then make use of the fabulous software-iMyFone iOS System Recovery to overcome this issue. It is the best tool to fix all sorts of iOS issues without any data loss. iMyFone Data recovery tool is available at reasonable cost and you can download from their official website without any difficulty. Follow fewer simple steps to resolve the iOS issue in no time using this outstanding software. Surf through the steps below for better understanding.Sponsor ads:
Gihosoft iPhone Data Recovery Free
Free iPhone Data Recovery Software for Windows/Mac
Recover up to 12+ types of files, including contacts, SMS, photos, WhatsApp, Viber, notes, etc.
Restore lost data from iOS devices directly or from iTunes and iCloud backup
Recover iPhone data lost due to iOS upgrade/jailbreak, accidental deletion, device lost or broken
Support all the latest iPhone, iPad and iPod Touch
Both Free and Pro version.
If you lost data after you updated to a new iPhone, you can always use Gihosoft iPhone Data Recovery to get the data back from the old iPhone or backup.You may also like: iphonerecovery.com
If you use android phones, please choose Gihosoft Android Data Recovery.
With Gihosoft Android Data Recovery, no longer afraid of data loss!
Gihosoft RePicvid Free Photo Recovery Software provides a free photo recovery software for windows to help users recover the deleted or lost photo for free.
Jihosoft Android Data Recovery: the best Android Data Recovery software for Windows and Mac to recover deleted contacts, messages, photos, videos, WhatsApp and etc from Android devices.Tips:How to transfer messages from iPhone to iPhone

How to Call Someone from a Blocked Number

How to Call Someone from a Blocked Numbe

Forging long-lasting relationships in life isn't as simple as it seems, and disagreements occur every single day. Unfortunately, though, not all disagreements can be resolved with mature conversation and sincere apologies. Sometimes, disputes will stretch that far that someone could block your phone number to avoid any further communication.

Now, if you genuinely need to contact that person who has blocked your number and wanna know how to call someone from a blocked number, then there are clever ways around it.


Hide Your Caller ID Then Make Call


Hide Your Number Before You Call


Other Tips to Call Someone That Blocked You


Recover Text/Call History from the Person
1. Hide Your Caller ID Then Make Call

The first method to contact someone who blocked you is to hide your caller ID, which will prevent the receiver from being able to see your number. When the receiver has an incoming call, it will be shown as "No Caller ID" rather than your number. Here's how to do this on an iPhone:


Step 1: Go into the Settings app on your iPhone, click into the "Phone" tab and you should see "Show My Caller ID".


Step 2: You'll see a simple toggle button, and you just need to slide to the ‘off' position.


Step 3: Once that's done, no-one will be able to see your number when you make a call.


2. Hide Your Number Before You Call

The second method is that you mask your phone number by dialling a special code before you input the receiver's number. When you do so, your number will appear as "Private" or "Unknown" instead of displaying your actual number. Here's how to do it:


Step 1: The special code you need to dial is *67 in the United States. For example, you'd need to put *67-405-231-XXXX.


Step 2: When you dial the full number with *67 before it, you'll be able to ring from a blocked number.


Note

In UK or Ireland, the special code is 141 and in Australia or New Zealand, it is 1831.
3. Other Tips to Call Someone That Blocked You

There are some other smart tips which you can try, which should allow you to call from a blocked number. They may be more complex and longwinded than the two listed above, but they have been proven to be effective nonetheless. So, if you want to discover some alternatives to the ones above, continue reading.

Call a landline: If you're aware of the person's landline number, then you can go ahead and give that a call.

Change your number: Of course, this isn't a viable option for the majority of people. But, if you don't mind going through the process of changing your number just to call one person, then it's definitely a strategy that would work. You can contact your service provider and request them to change the number for you.

Use another phone: Another way to call a number that has you blocked is by using another device, such as a public or friend's phone.

Ask for help from mutual friends: Why not seek the help of mutual friends to diffuse the situation and return to being civil?Sponsor ads:

Gihosoft Free iPhone Data Recovery:https://www.gihosoft.com/iphone-data-recovery-free.html

Gihosoft iPhone Data Recovery Free

Free iPhone Data Recovery Software for Windows/Mac

Recover up to 12+ types of files, including contacts, SMS, photos, WhatsApp, Viber, notes, etc.

Restore lost data from iOS devices directly or from iTunes and iCloud backup

Recover iPhone data lost due to iOS upgrade/jailbreak, accidental deletion, device lost or broken

Support all the latest iPhone, iPad and iPod Touch

Both Free and Pro version.

If you lost data after you updated to a new iPhone, you can always use Gihosoft iPhone Data Recovery to get the data back from the old iPhone or backup.You may also like: iphonerecovery.com

If you use android phones, please choose Gihosoft Android Data Recovery.

With Gihosoft Android Data Recovery, no longer afraid of data loss!

Must read:Youtube video downloader for pc

Gihosoft RePicvid Free Photo Recovery Software provides a free photo recovery software for windows to help users recover the deleted or lost photo for free.

Jihosoft Android Data Recovery: the best Android Data Recovery software for Windows and Mac to recover deleted contacts, messages, photos, videos, WhatsApp and etc from Android devices.Tips:How to transfer messages from iPhone to iPhone

jihosoft Free iPhone Data Recovery

Fix iTunes Not Recognizing iPhone Windows 10 with Apple Mobile Device USB Driver


Fix iTunes Not Recognizing iPhone Windows 10 with Apple Mobile Device USB Driver

Apple Mobile Device USB Driver is responsible for getting an iDevice recognized in iTunes. It may be possible that the iTunes not recognizing iPhone windows 10 problem is being caused by corrupted Apple Mobile Service. So you will need to troubleshoot this component of iTunes. You can enable, restart, or reinstall this component to solve the problem.
Enable

Follow these instructions to enable Apple Mobile Device USB Driver:

Step 1: Open Device Manager on your computer and look for Apple Mobile Device USB Driver.

Step 2: The driver is disabled if a downward arrow is displayed. To enable it, right click on it and then choose Enable.


Restart

If the driver is enabled and the problem still persists, then it is recommended that you restart Apple Mobile Device service. Follow these instructions:

Step 1: Open Control Panel on your computer and navigate to Programs > Programs and Features.

Step 2: Find Apple Mobile Device Support. If it’s available in the list, then you can proceed to the next step. If it’s not listed, then you will need to reinstall iTunes.

Step 3: Open Services app on your computer by using Windows logo and R key at the same time and typing services.msc in the textbox.

Step 4: Find Apple Mobile Device Services in the services list and double-click on it.

Step 5: Now click on Stop to stop the service and then click Start once the service has been stopped.

Step 6:Restart your computer.


Reinstall

If the problem is still not solved, then it is recommended that you reinstall Apple Mobile Device USB Driver. The process to do this is easy. Follow these instructions:

Step 1: Close iTunes.

Step 2: Open Device Manager and find Apple Mobile USB Driver from the list.

Step 3: Right-click on it and choose ‘Update driver’.

Step 4: Then choose ‘Browse my computer for driver software’. Click on Have Disk and then Browse.

Step 5: Now go to C:\Program Files\Common Files\Apple\Mobile Device Support\Drivers.

Step 6: Once there, select usbaapl or usbaapl64 (if you are using 64-bit version of Windows). Then follow the on-screen instructions to install the driver.
3. Other Common Solutions for iTunes Not Recognizing iPhone Windows 10

Following are some other common solutions you should try:


Use another lightning cable. It is also recommended that you try different USB ports of your computer when connecting your iPhone.


Unlock your iPhone when connecting it to computer and also make sure that you have ‘Trusted’ the computer from iPhone.


Update iPhone drivers on your Windows 10.


Update iTunes to the latest version.


Reinstall iTunes by completely uninstalling it first and then installing it after restarting your computer.


Install Media Feature Pack on your Windows PC if it isn’t installed already.


Install the latest Windows updates.


Sponsor ads:


Gihosoft Free iPhone Data Recovery:https://www.gihosoft.com/iphone-data-recovery-free.html


Gihosoft iPhone Data Recovery Free


Free iPhone Data Recovery Software for Windows/Mac


Recover up to 12+ types of files, including contacts, SMS, photos, WhatsApp, Viber, notes, etc.


Restore lost data from iOS devices directly or from iTunes and iCloud backup


Recover iPhone data lost due to iOS upgrade/jailbreak, accidental deletion, device lost or broken


Support all the latest iPhone, iPad and iPod Touch


Both Free and Pro version.


If you lost data after you updated to a new iPhone, you can always use Gihosoft iPhone Data Recovery to get the data back from the old iPhone or backup.You may also like: iphonerecovery.com


If you use android phones, please choose Gihosoft Android Data Recovery.


With Gihosoft Android Data Recovery, no longer afraid of data loss!


Must read:Youtube video downloader for pc


Gihosoft RePicvid Free Photo Recovery Software provides a free photo recovery software for windows to help users recover the deleted or lost photo for free.


Jihosoft Android Data Recovery: the best Android Data Recovery software for Windows and Mac to recover deleted contacts, messages, photos, videos, WhatsApp and etc from Android devices.Tips:How to transfer messages from iPhone to iPhone


jihosoft Free iPhone Data Recovery

What is iTunes/iPhone Error 14?


Trying to upgrading your iPhone/iPad/iPod to the latest iOS 12 but popping up this restore error 14? You are not alone. Though it’s not easy to fix but you can find the most effective ways here to get rid of this annoying error 14.


What is iTunes/iPhone Error 14?

Error 14 iTunes is very random and the exact cause of it hasn’t been discovered yet. As a result of this error, iTunes crashes, an error message is shown, and iTunes will forcibly close. Some symptoms of this error are:


An restore error message will be shown


The computer is significantly slower


Windows freezes momentarily


Computer completely freezes

The majority of the time an error message will appear, but if you have them disabled then you can identify iPhone restore error 14 by these symptoms.
So, What Causes This Error 14?

Again, the precise reason hasn’t been found, but there are a few things which we’ve found trigger it.


Faulty iTunes installation


Corrupt Windows’ registry files


Anti-virus program labelling iTunes as a threat


A virus which is attacking iTunes


Corrupt or missing iTunes files

Each of these things could be the source of your iTunes problems but fortunately, there are several fixes available and we’re going to walk you through them.
How to Repair “iPhone Could Not be Restored iTunes Error 14”


Sponsor ads:

Gihosoft Free iPhone Data Recovery:https://www.gihosoft.com/iphone-data-recovery-free.html

Gihosoft iPhone Data Recovery Free

Free iPhone Data Recovery Software for Windows/Mac

Recover up to 12+ types of files, including contacts, SMS, photos, WhatsApp, Viber, notes, etc.

Restore lost data from iOS devices directly or from iTunes and iCloud backup

Recover iPhone data lost due to iOS upgrade/jailbreak, accidental deletion, device lost or broken

Support all the latest iPhone, iPad and iPod Touch

Both Free and Pro version.

If you lost data after you updated to a new iPhone, you can always use Gihosoft iPhone Data Recovery to get the data back from the old iPhone or backup.You may also like: iphonerecovery.com

If you use android phones, please choose Gihosoft Android Data Recovery.

With Gihosoft Android Data Recovery, no longer afraid of data loss!

Must read:Youtube video downloader for pc

Gihosoft RePicvid Free Photo Recovery Software provides a free photo recovery software for windows to help users recover the deleted or lost photo for free.

Jihosoft Android Data Recovery: the best Android Data Recovery software for Windows and Mac to recover deleted contacts, messages, photos, videos, WhatsApp and etc from Android devices.Tips:How to transfer messages from iPhone to iPhone


jihosoft Free iPhone Data Recovery

iTunes Music Downloader: Get Free Music on iTunes


Part 1: Use Music-oriented Podcasts to Get Free iTunes Music

Another way to listen to free music on iTunes is music-oriented podcasts. Podcasts are prerecorded radio shows. They include tunes and commentary. So if you do not mind listening to chatters between songs, check out these podcasts because they are totally free. To browse podcasts, go to the iTunes Store and click the Podcasts link, go to the column on the right that says 'Podcast Quick Links' and click the drop-down menu. Choose Music, and you'll see hundreds of music podcasts.
Part 2: Get Free Music on iTunes

The iTunes music downloader, along with offering paid songs, also offers selective free songs available in the iTunes selection. This helps you in downloading songs free of cost.

iTunes updates its free music range every week with new songs, so if you want that free music, do not hesitate to check the free songs list because there is a lot of good music there.


Part 4: Top 3 iTunes Music Downloader

Sponsor ads:Best 5 Android Apps to Change Photo Backgrounds

Sponsor ads:5 Best Video to MP3 Converter to Extract Audio from Video Files

Sponsor ads:How to Go Live on Tik Tok/Musical.ly in 2019

What are the top 3 most recommended iTunes music downloaders? Well, here are the best ones for you. All these listed applications help users of iPhone, iPad or iPod to download music for their devices.
1. Freegal Music

It is one of the best music downloader for iOS users. Freegal Music is an application that enables users to download music legally. It has a wide collection of more than 9 million mp3 songs of various artists, of various genres, from all across the globe. The app is available in multiple languages including English, German, French, Spanish, Italian, and has been rated 4+.

The only con to the app is that it is region limited and hence only certain regions of the world can take 100% advantage of it.
2. SoundTube

Soundtube is a popular music downloader app. It is user-friendly; the interface is very convenient and has a good and wide range of song collection on various genres like rock, classic, country and others. It also allows to stream music from YouTube. Various features of the app include playing your favorite tunes, searching album, artist and songs, one tap music streaming, background music playback (A feature YouTube still doesn’t allow). Music through this app can also be shared on multiple social media platform.
3. Total Downloader

It is one of the most top rated music downloader apps available in the App Store. It not only allows downloading of music but also allows its users to download music videos.

The app comes packed with list of interesting features like multiple options of downloading, single tap downloading, multiple file support and others.

This application comes in multiple languages and the best part is, it is free to use.
Sponsor ads:Odin Flash Tool for Samsung Devices


Sponsor ads:Top 7 Best Websites to Convert AVI to MP4 Free Online 2019

How to Check Apple Warranty Status for Your iPhone/iPad 2019

How to Check Apple Warranty Status for Your iPhone/iPad 2019

Apple Inc. provides one year warranty as a standard coverage for all its products, but you can also pay for extra coverage. However, many Apple device users tend to forget the exact time they bought their Apple products, and people bear the cost of repairing their damage iPhone when their Apple Warranty is still active.

Have you forgotten the exact time you bought your iPhone X? Are you confused whether you paid for an extra Apple warranty coverage? Would you like to check apple warranty? Would you like to access Apple’s warranty coverage checker? Would you like to know what to do if your iPhone is not covered by Apple warranty? We shall be aiding you to get the right answers to the above question in the following parts of this post.


Part 1: How to Check Apple Warranty Status


Part 2: What If Your iPhone is Out of Warranty
How to Check Apple Warranty Status

With the release of Apple’s own support app for Apple warranty check, getting to know your iPhone warranty status is a whole lot easier now. You can also use Apple’s warranty coverage checker is also handy in checking your warranty coverage status. We’ve listed the steps in using this method below.
#1. How to Check Apple Warranty via Apple Support App

Step 1: Download and install Apple Support app from the App Store.

Step 2: Open the Apple Support app, and log in using your Apple ID and Password.

Step 3: Apple support will show you a list of all devices associated with your ID. Choose the one you want to check and click on it.

Step 4: Click on “Product Detail” at the top of the page, and you’ll see the details of your product if it’s covered by AppleCare or Limited Warranty.


#2. How to Check Apple Warranty via Apple's Warranty Coverage Checker

The Apple warranty coverage checker is a website that covers apple iPhone warranty check.

Step 1: Go to Apple's Warranty Coverage Checker website.

Step 2: Enter your IMEI serial number, type the code into the box, and click “Continue”.

Step 3: Your Apple Warranty statues will be displayed.


Tip: How to Find Your iPhone’s Serial Number

To find your iPhone serial number is not a hard nut to crack, all it takes is to follow these steps:

Step 1: Open your Setting app, and click on General > About.

Step 2: The page displayed to you has your iPhone Serial number on it.
What If Your iPhone is Out of Warranty

You may be filed with the expectation that your Apple warranty coverage is still active, but what if it has expired after doing an apple warranty check? Here are some guides to help you:
#1. Buy a Single Incident of Support

If your device is out of Apple warranty, you can buy a single incident of support.

Step 1: Go AppleCare Pay-Per-Incident Support, and purchase a single incident of support for help troubleshooting Apple devices such as AirPort devices, Apple TV, iPad, iPhone, iPod, or Mac computers.

Step 2: Follow the onscreen process to complete your payment.


#2. Completely Reset iPhone to Fix Some Problems

If troubleshooting your iPhone doesn’t solve the problem at hand, and you don’t have the warranty to change your iPhone for a new one, then consider resetting your iPhone to factory settings to fix the problem.

Sponsor ads:

Gihosoft Free iPhone Data Recovery:https://www.gihosoft.com/iphone-data-recovery-free.html

Gihosoft iPhone Data Recovery Free

Free iPhone Data Recovery Software for Windows/Mac

Recover up to 12+ types of files, including contacts, SMS, photos, WhatsApp, Viber, notes, etc.

Restore lost data from iOS devices directly or from iTunes and iCloud backup

Recover iPhone data lost due to iOS upgrade/jailbreak, accidental deletion, device lost or broken

Support all the latest iPhone, iPad and iPod Touch

Both Free and Pro version.

If you lost data after you updated to a new iPhone, you can always use Gihosoft iPhone Data Recovery to get the data back from the old iPhone or backup.You may also like: iphonerecovery.com

If you use android phones, please choose Gihosoft Android Data Recovery.

With Gihosoft Android Data Recovery, no longer afraid of data loss!

Must read:Youtube video downloader for pc

Gihosoft RePicvid Free Photo Recovery Software provides a free photo recovery software for windows to help users recover the deleted or lost photo for free.

Jihosoft Android Data Recovery: the best Android Data Recovery software for Windows and Mac to recover deleted contacts, messages, photos, videos, WhatsApp and etc from Android devices.Tips:How to transfer messages from iPhone to iPhone


jihosoft Free iPhone Data Recovery

Wednesday 27 February 2019

How to Add Ringtones to iPhone on Old iTunes


How to Add Ringtones to iPhone on Old iTunes

It is a little bit more cumbersome, but you are able to add music from iTunes to your phone as a ringtone. Try it once and you’ll see why iMyFone TunesMate is an easy choice.

Since the latest iTunes has removed the Tones tab, this method is only for iTunes which is before version 12.7.

Tones tab disappears on iTunes 12.7? How to Transfer Ringtones Using iTunes >>


Step 1. Plug your iPhone into your computer. Open iTunes on your computer.

Step 2. If the ringtone is not in your iTunes library, drag your desired m4r files into iTunes to add them to your library.

Step 3. Within iTunes, click on your device and then choose Tones from the menu on the left.

Step 4. Check the box labeled Sync Tones.

Step 5. Choose All Tones or Selected Tones according to your preference.

Step 6. After you have selected the appropriate ringtones, click Apply and the tones will be synced to your iPhone.

Disadvantages:


You can't put the ringtones directly from computer to iPhone wihout going through iTunes library.


Syncing iTunes files to iPhone will delete the existing files from iPhone as well.
How to Download Purchased Ringtones on iPhone

An easy way to add new ringtones to your iPhone is by doing it straight through your phone’s settings or the ToneStore. The two main problems with this method are that (1) ringtones cost about the same amount as a full song and (2) you are limited to tones available through iTunes.

If you are alright with those drawbacks, then here are the steps to follow:


Step 1. Open the Settings on your iPhone.

Step 2. Scroll down until you find Sounds and tap on it.

Step 3. Select Ringtone.

Step 4. Tap on Download All Purchased Ringtones to add any ringtones you may have previously purchased from your current Apple ID.

Step 5. Optional: To purchase new ringtones, tap on Tone Store to go to a special section of the iTunes Store devoted just to ringtones.Sponsor ads:

Gihosoft Free iPhone Data Recovery:https://www.gihosoft.com/iphone-data-recovery-free.html

Gihosoft iPhone Data Recovery Free

Free iPhone Data Recovery Software for Windows/Mac

Recover up to 12+ types of files, including contacts, SMS, photos, WhatsApp, Viber, notes, etc.

Restore lost data from iOS devices directly or from iTunes and iCloud backup

Recover iPhone data lost due to iOS upgrade/jailbreak, accidental deletion, device lost or broken

Support all the latest iPhone, iPad and iPod Touch

Both Free and Pro version.

If you lost data after you updated to a new iPhone, you can always use Gihosoft iPhone Data Recovery to get the data back from the old iPhone or backup.You may also like: iphonerecovery.com

If you use android phones, please choose Gihosoft Android Data Recovery.

With Gihosoft Android Data Recovery, no longer afraid of data loss!

Must read:Youtube video downloader for pc

Gihosoft RePicvid Free Photo Recovery Software provides a free photo recovery software for windows to help users recover the deleted or lost photo for free.

Jihosoft Android Data Recovery: the best Android Data Recovery software for Windows and Mac to recover deleted contacts, messages, photos, videos, WhatsApp and etc from Android devices.Tips:How to transfer messages from iPhone to iPhone

jihosoft Free iPhone Data Recovery

3 Methods to Erase iPhone without iTunes [Recommended]


Erase iPhone without iTunes via Hard Reset

Hard reset is a process of deleting iPhone back to its default state when produced from the manufacturer’s factory. Also, some reasons can prompt you to hard reset your iPhone. You may want to clean your phone and return it to its normal state due to some unfortunate performance problem that may occur after using your phone for a long time. Hard reset is one of the useful methods to factory reset iPhone without iTunes.

You can follow the steps on how to erase iPhones without iTunes:

Step 1: Firstly, connect your iPhone to a computer.

Step 2: When your device is connected, for iPhone 8 and 8 plus, press and release the Up volume button on the iPhone. Repeat the process for the down volume button; hold the side buttons still the recovery mode screen display on your screen.


For iPhone 7 and 7 plus, press and hold the down volume button and the sidesimultaneously until the recovery mode screen display.


For iPhone 6s, Press and hold the side and Home buttons simultaneously until the recovery mode screen display.

Step 3: You can select the “Restore” button from the recovery mode screen.

Step 4: Finally, configure your iPhone when the update is complete.


How to Hard Reset iPhone X Using the Home and Power Button:

Erasing files on iPhone X is a little bit difficult. However, you can follow these steps below to hard reset your iPhone X without iTunes.

Step 1: Press and quickly release the Up volume button.

Step 2: You can repeat the process in step 1 for the down volume button.

Step 3: Then, press and quickly hold the side button (Sleep/Wake button), you must not release the button unless the Apple symbol display.

Step 4: Finally, you can attempt to reset the iPhone settings.
Erase iPhone without iTunes Through Settings

To factory reset your iPhone with the phone settings option is easy. You can just follow the steps below:

Step 1: Go to the settings on your iPhone and Click on the general setting.

Step 2: Scroll down to the “General settings” and click on “Reset”.

Step 3: Select “Erase” option on the settings.

Step 4: To validate this process, you will be required to provide your iPhone password. Click on “Erase iPhone” to complete the reset.


Erase iPhone without iTunes Using Find My iPhone

It is simple to factory reset iPhone using Find My iPhone feature on iCloud. If Find My iPhone is enabled on your iPhone, it can be erased with iCloud.

You can follow these steps to erase iPhone without iTunes:

Step 1: Open your web browser and search for iCloud (www.iCloud.com).

Step 2: Ensure you sign in with your Apple ID.

Step 3: Select Find My iPhone.

Step 4: Click on the device menu at the top corner of the browser window.

Step 5: Select the iPhone you want to erase.

Step 6: Click on "Erase iPhone" button.


Sponsor ads:

Gihosoft Free iPhone Data Recovery:https://www.gihosoft.com/iphone-data-recovery-free.html

Gihosoft iPhone Data Recovery Free

Free iPhone Data Recovery Software for Windows/Mac

Recover up to 12+ types of files, including contacts, SMS, photos, WhatsApp, Viber, notes, etc.

Restore lost data from iOS devices directly or from iTunes and iCloud backup

Recover iPhone data lost due to iOS upgrade/jailbreak, accidental deletion, device lost or broken

Support all the latest iPhone, iPad and iPod Touch

Both Free and Pro version.

If you lost data after you updated to a new iPhone, you can always use Gihosoft iPhone Data Recovery to get the data back from the old iPhone or backup.You may also like: iphonerecovery.com

If you use android phones, please choose Gihosoft Android Data Recovery.

With Gihosoft Android Data Recovery, no longer afraid of data loss!

Must read:Youtube video downloader for pc

Gihosoft RePicvid Free Photo Recovery Software provides a free photo recovery software for windows to help users recover the deleted or lost photo for free.

Jihosoft Android Data Recovery: the best Android Data Recovery software for Windows and Mac to recover deleted contacts, messages, photos, videos, WhatsApp and etc from Android devices.Tips:How to transfer messages from iPhone to iPhone

jihosoft Free iPhone Data Recovery

Tuesday 26 February 2019

How to Delete Videos from iPhone 2019


How to Delete Videos from iPhone Permanently Using Factory Reset

Another option that you have for learning how to delete videos from iPhone permanently is by factory resetting through the “Settings” app. Doing this is relatively easy although if you aren’t aware of the steps involved, follow our guide below.

Note

One important thing that you have to keep in mind when you use this method to delete your videos is that you shouldn’t take a backup beforehand. If you do this, videos can also be backed up, if you restored from backup, all your videos will come back. It defeats the point of permanently deleting them in the first place – this also applies to contact information, app data, and your photos too.
Steps to Delete Videos from iPhone Permanently

Step 1. Unlock your iPhone and tap on the “Settings” app to launch it.

Step 2. From the list of options that are shown, tap on “General > Reset > Erase All Content and Settings”.


Step 3. You’ll be asked to enter your passcode, so go ahead and enter this now, and will also be prompted to enter your Apple ID (so that it can also be removed from your device).

Step 4. Lastly, tap on the “Erase iPhone” button and the process will begin.

After it has been erased, all of your videos and other data will be deleted from your iPhone.
The Ordinary Method to Delete Videos from iPhone (Recoverable)

The final method that we’ll be showing you is ineffective for permanently removing data because if you download a recovery tool, you can easily recover the data. Nonetheless, if you want to use the regular method for deleting videos from an iPhone, follow the steps below.

Step 1. Unlock your iPhone and tap on the “Photos” app.

Step 2. Tap on the “Photos” tab and then on “Select” at the top of the display.

Step 3. Select any of the videos that you want to delete from your iPhone.


Step 4. Press the trash icon at the bottom-right of the app and then on “Delete Videos”.

Step 5. Now tap on the “Albums” tab and select the album which should be called “Recently Deleted”.

Step 6. Again, tap on “Select”, select the videos that you just deleted, tap on the trash icon, and delete them from the album.


Note

While this is a relatively simple method which gets the job done and takes no more than a minute or so, it won’t permanently delete your videos. Someone can still recover it with recovery apps.
How to Permanently Wipe Videos that Already Deleted by Ordinary Method
Sponsor ads:
Solve MX Player AC3 Audio Format Not Supported Problem?
Gihosoft Free iPhone Data Recovery:https://www.gihosoft.com/iphone-data-recovery-free.html

Gihosoft iPhone Data Recovery Free

Free iPhone Data Recovery Software for Windows/Mac

Recover up to 12+ types of files, including contacts, SMS, photos, WhatsApp, Viber, notes, etc.

Restore lost data from iOS devices directly or from iTunes and iCloud backup

Recover iPhone data lost due to iOS upgrade/jailbreak, accidental deletion, device lost or broken

Support all the latest iPhone, iPad and iPod Touch

Both Free and Pro version.

If you lost data after you updated to a new iPhone, you can always use Gihosoft iPhone Data Recovery to get the data back from the old iPhone or backup.You may also like: iphonerecovery.com

If you use android phones, please choose Gihosoft Android Data Recovery.

With Gihosoft Android Data Recovery, no longer afraid of data loss!

Must read:Youtube video downloader for pc

Gihosoft RePicvid Free Photo Recovery Software provides a free photo recovery software for windows to help users recover the deleted or lost photo for free.

Jihosoft Android Data Recovery: the best Android Data Recovery software for Windows and Mac to recover deleted contacts, messages, photos, videos, WhatsApp and etc from Android devices.Tips:How to transfer messages from iPhone to iPhone


jihosoft Free iPhone Data Recovery

Transfer Videos from Mac to iPhone Without iTunes 2019


Transfer Videos from Mac to iPhone Without iTunes - Via Email

If the size of the video you want to transfer from your Mac to iPhone is not too large (less than 25MB), then you can use this method to transfer it. The process is quite simple.

Follow these steps to transfer a video from Mac to iPhone via Email:

Step 1: Sign in to your email account using the web browser on your Mac.

Step 2: Use Compose option to send a new mail and enter your email address as recipient.


Step 3: Now use the attachment icon to choose the video you wish to transfer and then send the email.

Step 4: Once the email is sent, use the web browser on your iPhone to view that email and download the attached video to your iPhone.Also Read:Windows Media Player Won’t Play AVI Troubleshooting


Cons


Only suitable for sending small size videos (less than 25MB).


Relatively slower transfer speed as compared to offline transfer methods.
3 Transfer Videos from Mac to iPhone Without iTunes – Dropbox

Dropbox is a popular cloud storage service that you can use to transfer your videos from Mac to iPhone. However, keep in mind that you have limited storage space on Dropbox (unless you have a premium account and purchased additional storage), so make sure to only use this method for video transfer if the size of the video is small.

Follow these instructions:

Step 1: Visit Dropbox on the web browser of your Mac.

Step 2: Upload the video to your Dropbox storage that you wish to transfer to your iPhone.


Step 3: Once the video is uploaded successfully, use Dropbox app on your iPhone to navigate to your uploaded video and download it. Remember to use the same Dropbox account on both your Mac and your iPhone.

Cons


Relatively slower transfer speed (depends on your internet) as compared to offline methods.


Only suitable for small size videos because of storage limitations of Dropbox.
How to Transfer Videos from Mac to iPhone Using iTunes

Using iTunes to transfer videos from Mac to iPhone is not that difficult, but because iTunes is known to have issues (crashes, syncing problems, erasing your previous data after syncing, etc.), most people try to avoid it and use third-party file transfer softwares. The process of transferring videos via iTunes is similar to transferring other media such as music, podcasts, etc.

Here are the steps to transfer videos from Mac to iPhone Via iTunes:

Step 1: Connect your iPhone via USB to your Mac.

Step 2: Launch iTunes and use File>Add File to Library option to import your video(s).


Step 3: Navigate to the videos folder on your Mac and then select the ones you wish to transfer in order to start the transfer process. Alternatively, you can also use the drag and drop method to add videos to your iPhone.

Sponsor ads:

Gihosoft Free iPhone Data Recovery:https://www.gihosoft.com/iphone-data-recovery-free.html

Gihosoft iPhone Data Recovery Free

Free iPhone Data Recovery Software for Windows/Mac

Recover up to 12+ types of files, including contacts, SMS, photos, WhatsApp, Viber, notes, etc.

Restore lost data from iOS devices directly or from iTunes and iCloud backup

Recover iPhone data lost due to iOS upgrade/jailbreak, accidental deletion, device lost or broken

Support all the latest iPhone, iPad and iPod Touch

Both Free and Pro version.

If you lost data after you updated to a new iPhone, you can always use Gihosoft iPhone Data Recovery to get the data back from the old iPhone or backup.You may also like: iphonerecovery.com

If you use android phones, please choose Gihosoft Android Data Recovery.

With Gihosoft Android Data Recovery, no longer afraid of data loss!

Must read:Youtube video downloader for pc

Gihosoft RePicvid Free Photo Recovery Software provides a free photo recovery software for windows to help users recover the deleted or lost photo for free.

Jihosoft Android Data Recovery: the best Android Data Recovery software for Windows and Mac to recover deleted contacts, messages, photos, videos, WhatsApp and etc from Android devices.Tips:How to transfer messages from iPhone to iPhone

jihosoft Free iPhone Data Recovery

Monday 25 February 2019

How to Buy Audible Books on iPhone/iPad 2019


1. How to Buy Audible Books on iPhone/iPad

You can buy audible books on your iPhone/iPad from iBooks app. The following steps will guide you.


Step 1: Visit the iBooks on your iPhone/iPad.

Step 2: You can find the books from “Featured”, “Top Charts”, or “Search” tab. Tap “Audiobooks” at the top if you go to “Featured” or “Top Charts”.


Featured: The audible books that are new and featured by Apple will be displayed there.


Top Chart: The most popular audible books will be found there.


Search: You can search for the specific audible book.

Step 3: Click on the title of the audible book that you want to buy.
2. How to Redownload Purchased Audible Books on iPhone

If you want to redownload the audiobooks you have already purchased, all you have to do is follow the instructions below. The step is straightforward and easy to understand.

Step 1: Launch the iBook app.

Step 2: Click on Purchase at the bottom. Tap “Audiobooks”.

Step 3: Press “Not on This [device]”.

Step 4: Look for the audible book you want to download and click on it the iCloud icon beside it.


The audible book will be downloaded on your device.
3. How to Get Free Audible Books on iPhone/iPad

If you have get free audible books on computer or external hard drive, you can consider transfer them to iPhone. Generally, you can use iTunes. But you need to note the limits of using iTunes:


Files can be lost while syncing, especially those files you didn’t buy on your iPhone from the official store.Sponsor ads:Transfer Contacts from Windows Phone to Android and iPhone

Syncing of files is done blindly, and you can’t export them one at a time.

Not every type of audio format can be exported.

Audiobook syncing can only be done from one iTunes library to iPhone, but not from iPhone to iTunes.

iTunes does not allow syncing audiobooks to iPhone directly from PC.Sponsor ads:Fix “Please insert a disk into removable disk” without Losing Data
How to Duplicate Snapchat on iPhone in 2019 (iOS 12 Supported)

2 Effective Methods to Find Your Missing iTunes Purchases


Method 1: Confirm Your Login Details And Use “All” Option To View Your Purchases List

Sometimes the main reason why bought media content might not be showing on your purchases list is because you have used a different account or even viewing your purchases with the option of “Not in My Library.” To fix this issue:

Step 1: Check your login and make sure you have logged in using the account you used when making the purchases. If not, log in using the correct details.

Step 2: If you are using the right details then try signing out and then sign in.

Step 3: After signing in choose Account > Purchased from the menu bar at the top of your computer screen or at the top of the iTunes window.


Step 4: Then ensure that you Click " All " to view all the content that you have ever purchased. "Not in My Library" only shows purchased content, not on your device.


Method 2: Confirm Your Purchased iTunes Media is Not Hidden

Apple allows one to hide purchases from iTunes store. Sometimes this feature might be advantageous especially when one buys disturbing content. However, protecting content and then forgetting about it might be the sole reason why your purchased iTunes songs are missing. Other times one might accidentally conceal bought content unconsciously. To unhide purchased iTunes music:

Step 1: Launch iTunes on your Mac or PC and then sign in with the right Apple ID if not signed in.

Step 2: From the menu bar, choose Account > View My Account.

Step 3: On the account information choose Store and then scroll down to Hidden Purchases and click Manage.


Step 4: Choose either Music, Movies, TV Shows, Apps, or Audiobooks depending on the media content you want to unlock.

Step 5: Find the item you wish to unhide then click unhide under it. When you do this for all your hidden items then you will be able to view all your bought items on your purchases list.


Sponsor ads:

Gihosoft Free iPhone Data Recovery:https://www.gihosoft.com/iphone-data-recovery-free.html

Gihosoft iPhone Data Recovery Free

Free iPhone Data Recovery Software for Windows/Mac

Recover up to 12+ types of files, including contacts, SMS, photos, WhatsApp, Viber, notes, etc.

Restore lost data from iOS devices directly or from iTunes and iCloud backup

Recover iPhone data lost due to iOS upgrade/jailbreak, accidental deletion, device lost or broken

Support all the latest iPhone, iPad and iPod Touch

Both Free and Pro version.

If you lost data after you updated to a new iPhone, you can always use Gihosoft iPhone Data Recovery to get the data back from the old iPhone or backup.You may also like: iphonerecovery.com

If you use android phones, please choose Gihosoft Android Data Recovery.

With Gihosoft Android Data Recovery, no longer afraid of data loss!

Must read:Youtube video downloader for pc

Gihosoft RePicvid Free Photo Recovery Software provides a free photo recovery software for windows to help users recover the deleted or lost photo for free.

Jihosoft Android Data Recovery: the best Android Data Recovery software for Windows and Mac to recover deleted contacts, messages, photos, videos, WhatsApp and etc from Android devices.Tips:How to transfer messages from iPhone to iPhone

jihosoft Free iPhone Data Recovery
Sponsor ads:Setup Dual Monitors in Windows 10 Computer 2019
Sponsor ads:Recover Deleted Video and Audio Files from Android Phone
Sponsor ads:Free File Recovery Software 2019 for Windows and Mac

Transfer Everything to New iPhone X / iPhone 8 2019

Transfer Everything to New iPhone X / iPhone 8 2019
Transfer Everything to New iPhone via iTunes

First of all, you need to make sure that the content of your old phone is backed up with iTunes. When you are done with this part, you can then follow the next steps to easily restore content.

First let us see how to execute the first step and then we will proceed to the second one.
Back up the old phone with iTunes


On your computer, connect the old iPhone.


Now launch iTunes on the device.


Click on the phone icon which will appear in the menu bar in iTunes.


Now click on ‘Back up now’ option.


The next step is to click on ‘encrypt backup’ and then you have to add a password.


If prompted, skip backup apps.


Now, when the backup is done, unplug the old iPhone.


Restoring content on new iPhone


Launch iTunes on your computer and plug in the new iPhone to your system.


Select the “restore from iTunes backup” option.


You will find a lot of backup files. You need to choose the backup file from which you want to restore the content.


If the backup file was encrypted, enter the password when prompted.


Now, keep the phone plugged until the backup is restored on the new device.


Tip 4. Transfer Everything to New iPhone via iCloud

When you are looking to transfer content to your new iPhone using the iCloud option, here are the steps to follow.
Back up the old phone with iCloud


Take the old iPhone and make sure that it is connected to Wi-Fi.


On the home screen, click settings and then tap on iCloud.


Now, tap on the backup option and then click on “back up now”.


When the backup is finished, turn off the iPhone .Sponsor ads:


Gihosoft Free iPhone Data Recovery:https://www.gihosoft.com/iphone-data-recovery-free.html


Gihosoft iPhone Data Recovery Free


Free iPhone Data Recovery Software for Windows/Mac


Recover up to 12+ types of files, including contacts, SMS, photos, WhatsApp, Viber, notes, etc.


Restore lost data from iOS devices directly or from iTunes and iCloud backup


Recover iPhone data lost due to iOS upgrade/jailbreak, accidental deletion, device lost or broken


Support all the latest iPhone, iPad and iPod Touch


Both Free and Pro version.


If you lost data after you updated to a new iPhone, you can always use Gihosoft iPhone Data Recovery to get the data back from the old iPhone or backup.You may also like: iphonerecovery.com


If you use android phones, please choose Gihosoft Android Data Recovery.


With Gihosoft Android Data Recovery, no longer afraid of data loss!


Must read:Youtube video downloader for pc


Gihosoft RePicvid Free Photo Recovery Software provides a free photo recovery software for windows to help users recover the deleted or lost photo for free.


Jihosoft Android Data Recovery: the best Android Data Recovery software for Windows and Mac to recover deleted contacts, messages, photos, videos, WhatsApp and etc from Android devices.Tips:How to transfer messages from iPhone to iPhone


jihosoft Free iPhone Data Recovery


Now, we will proceed to restoring the backup on your new iPhone. Here are the steps for that
Restore new iPhone with iCloud backup


Set up the new iPhone.


Choose the restore from iCloud backup option.


You will be asked to sign in to your iCloud account. Do that using your Apple ID.


Click on “Next”.


Agree to the terms and conditions and then click “Confirm”.


Choose the most recent backup from the list.


Enter the iCloud password.


Let the restoration process complete. It might take time depending on the size of the backup
Sponsor ads:Check Who Viewed Your Facebook Profile?
Sponsor ads:Find Songs by Humming Online with Web/Mobile Apps Sponsor ads:How to Fix “The action can’t be completed because…”

Gihosoft Free iPhone Data Recovery:iphonerecovery.com

If you use android phones, please choose Gihosoft Android Data Recovery


Sponsor ads:10 Best Two Player Games for iPhone and iPad to play Challenges with Your Friends

iOS 13: All The New Features in Safari on iPhone

Safari update in iPadOS 13 is turning the iPad into a real computer . And most of those improvements make their way to the iPhone as well. ...